How to Access Private S3 Objects with AWS Cognito

Scenario
Let's assume you have developed some applications for your customer. However, there are some files such as PDF, Word, Excel, etc. related to records in the applications. For the simplicity of the scenario, let's assume that these files are stored in a single private S3 bucket on AWS.
Users need to be able to access these related files from the private S3 bucket through a URL link in the applications. Our solution needs to work as a portable solution for any in-house software.
Introduction
The purpose of this article is to demonstrate how to download files from a private S3 bucket using Cognito user pools. In addition to Cognito, the flow from Cognito to API Gateway with Authorizer and the collaboration between API Gateway and Lambda is demonstrated.
As many screenshots as possible have been shared for each step from the AWS console. Many visuals have been added especially for beginners to make the steps clearer.
Background
Some preliminary reading may be helpful to better understand what is developed in this article. The following links will be especially useful for those new to AWS:
What Should Be Done?
Many flows or methods can be coded for such a task. Here, we will implement the method shown below. A brief description of how the scenario will be implemented is presented in the visual below.
The visual below shows that we need to create some elements such as Cognito User Pool, S3 buckets, API Gateway Methods, Lambda Functions, etc. After creating all the assets in the AWS environment, we need to configure them appropriately so that they can all work together in collaboration.
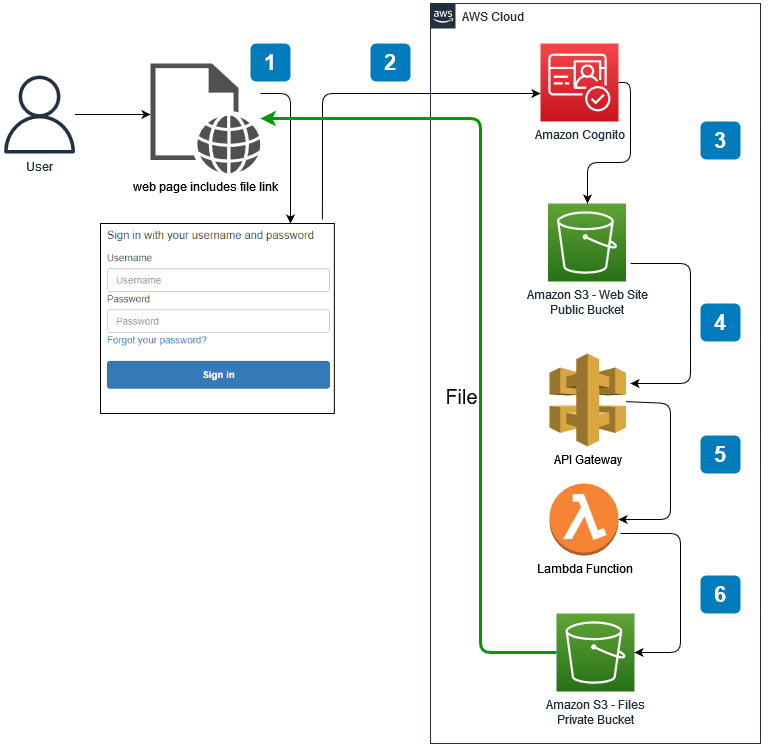
It is better to create all the elements in the AWS environment in reverse order. For example, to use Lambda with an API method, if the Lambda function is developed first, it can be easily connected when the API Gateway method is created. Similarly, in Step 5, we should create the S3 web bucket and put the
callback.html file in it so that we can use this file when creating the Cognito User Pool in Step 6. Of course, this is not mandatory, but this order will make development easier. Therefore, this approach is preferred here.Outline
We will seek answers to the following questions. Remember that you need to have an AWS account to apply all the steps in this article.
- How to Create a Private S3 Bucket?
- How to Create a Custom Policy for Permission to Access Objects in the Private S3 Bucket?
- How to Create a Lambda Function to Access Objects in the Private S3 Bucket?
- How to Create a Gateway API to Use the Lambda Function?
- How to Create a Public S3 Bucket to Use as a Web Folder?
- How to Create and Configure a Cognito User Pool?
- How to Test the Scenario?
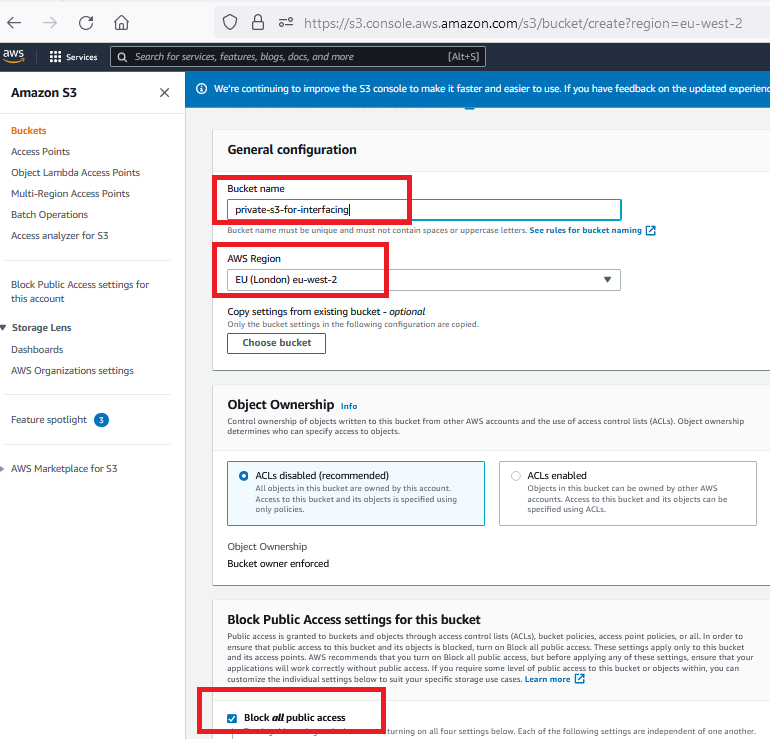
1. How to Create a Private S3 Bucket?
S3 is one of the region-based services on AWS. Items in S3 buckets are called objects. Therefore, the terms object and file can be used interchangeably for S3 buckets in AWS.
Keep the "Block All Public Access" checkbox checked. A private S3 bucket has been created here. Although there are many extra configuration options, we are creating it with default values for the simplicity of the solution.
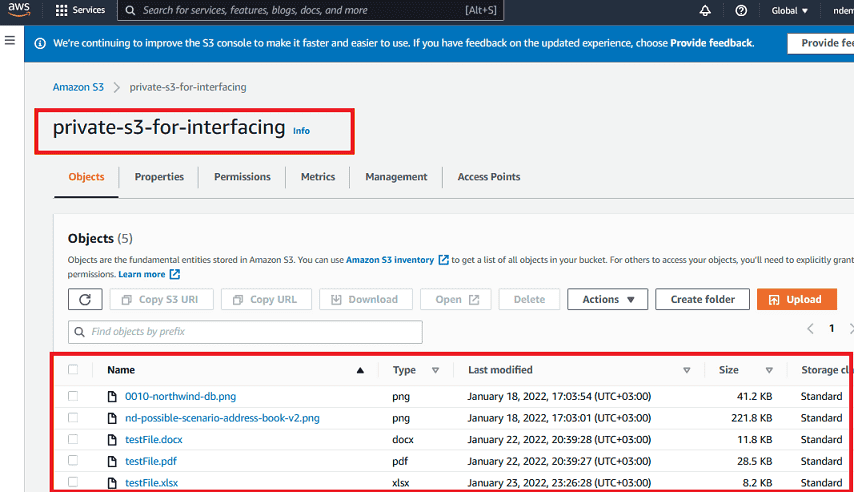
Upload some objects to the S3 bucket to test private access. Then, try to access these objects with unauthorized users or possible access links. Although we know files as PDF, DOC, XLS, etc., in AWS S3 terminology, all of them are called objects.
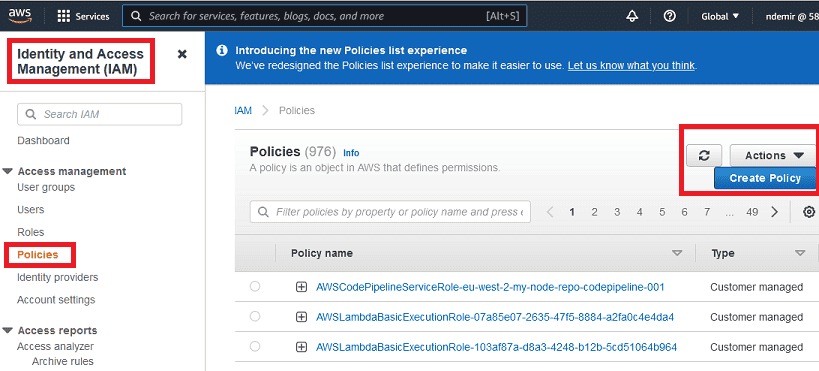
2. Creating a Policy for Permission to Access Objects in the Private S3 Bucket
IAM (Identity and Access Management) in AWS is the foundation of all services! Users, Groups, Roles, and Policies are the basic concepts we need to be familiar with.
There are many built-in roles and each role has many built-in policies that mean permissions. These are called "AWS Managed". However, it is also possible to create "Customer Managed" roles and policies. Therefore, a custom policy has been created here.
- Create a custom IAM policy to retrieve objects from your private S3 bucket.
- Find the existing policy list in AWS and create a new one to perform only the
GetObjectoperation from your private S3 bucket as shown below:
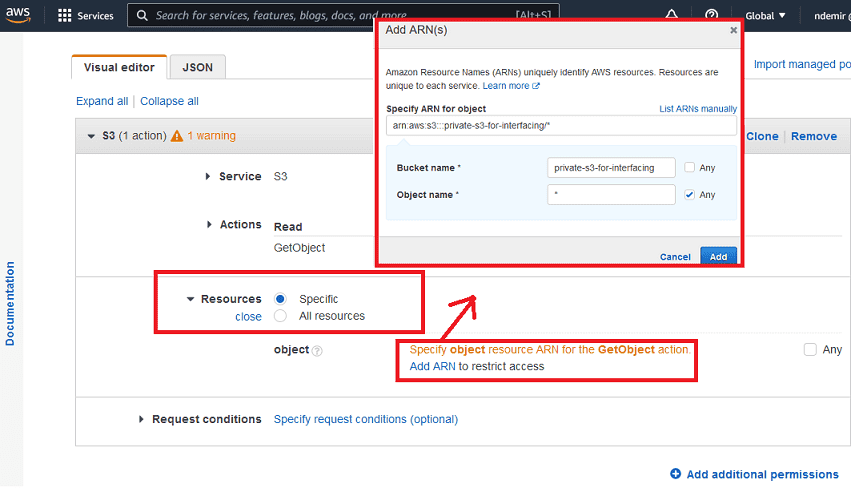
Create a custom policy as shown below. Select S3 as the service and only
GetObject as the action:
Select "specific" as the resource and specify your private S3 bucket for the policy to have the desired capabilities:
Give your policy a name and create it. You can give any name but you will need to remember it.
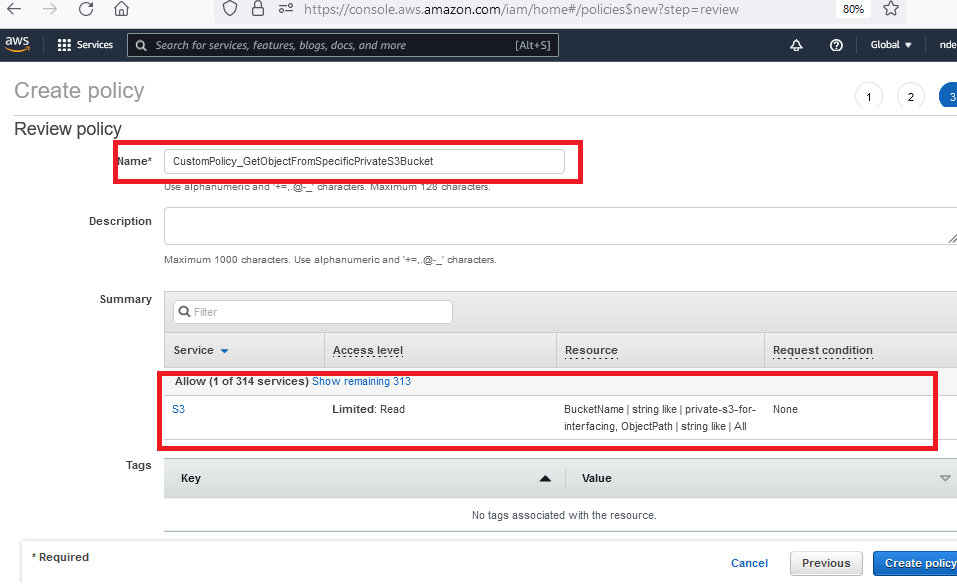
The summary of your custom policy will look like the following. It is also possible to create a policy by directly using this JSON content:
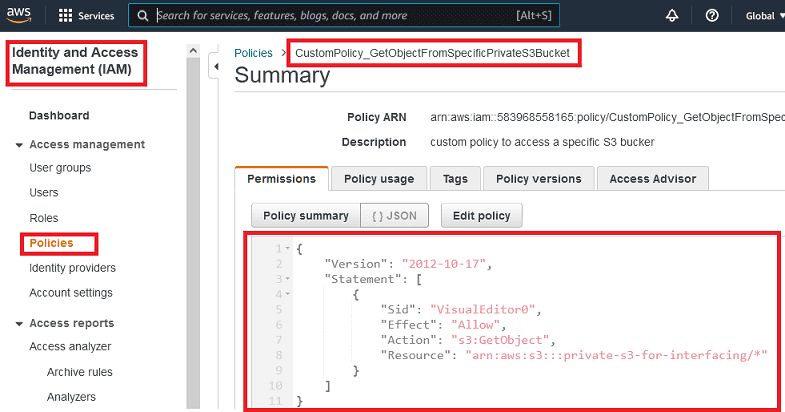
Policy JSON Definition:
JSON
{
    "Version": "2012-10-17",
    "Statement": [
        {
            "Sid": "VisualEditor0",
            "Effect": "Allow",
            "Action": "s3:GetObject",
            "Resource": "arn:aws:s3:::private-s3-for-interfacing/*"
        }
    ]
}
3. Creating a Lambda Function to Access Objects in the Private S3 Bucket
The latest version of NodeJS has been used for the Lambda function here. Create a Lambda function and select NodeJS. It is possible to choose any supported language for the Lambda function such as Python, Go, Java, .NET Core, etc.
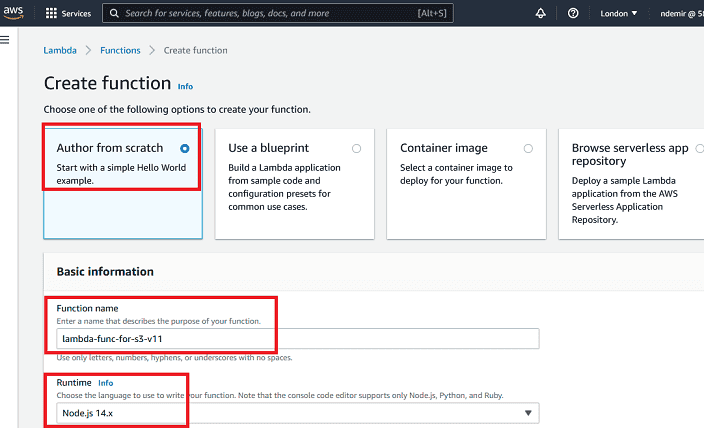
When you create a Lambda function, a sample "hello" code is shown. We need to develop our own code instead.
As can be seen, the Lambda development environment resembles a web-based lightweight IDE.
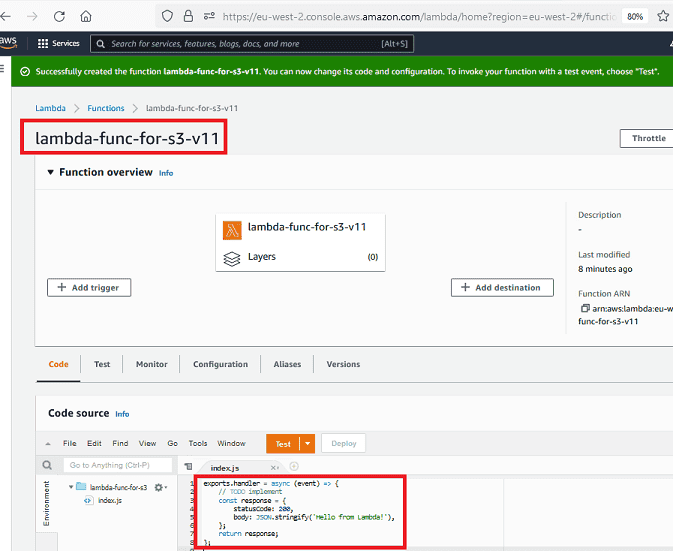
Replace the existing code with the given short sample code. The new version of the code will be as follows. Press the "Deploy" button to use the Lambda function after changing the code.
For the simplicity of the scenario, the bucket name is used statically. The file name is sent as a parameter with the name
fn. Although the default content type is assumed to be pdf, it can be any file type applied in the Lambda function code. Since we will prefer to use the proxy feature of the Lambda function in the API Gateway connection, the response header contains some additional data required.NodeJS Lambda Code (returning as Blob):
JavaScript
// The Lambda function code looks like this
// This code will return the response as blob content
// Callback-to-Download-Blob.html in attachments can be used to download the file

const AWS = require('aws-sdk');
const S3= new AWS.S3();
exports.handler = async (event, context) => {

  let fileName;
  let bucketName;
  let contentType;
  let fileExt;

  try {
    bucketName = 'private-s3-for-interfacing';
    fileName = event["queryStringParameters"]['fn']
    contentType = 'application/pdf';
    fileExt = 'pdf';

    //------------
    fileExt = fileName.split('.').pop();

    switch (fileExt) {
        case 'pdf': contentType = 'application/pdf'; break;
        case 'png': contentType = 'image/png'; break;
        case 'gif': contentType = 'image/gif'; break;
        case 'jpeg': case 'jpg': contentType = 'image/jpeg'; break;
        case 'svg': contentType = 'image/svg+xml'; break;
        case 'docx': contentType = 'application/vnd.openxmlformats-officedocument.wordprocessingml.document'; break;
        case 'xlsx': contentType = 'application/vnd.openxmlformats-officedocument.spreadsheetml.sheet'; break;
        case 'pptx': contentType = 'application/vnd.openxmlformats-officedocument.presentationml.presentation'; break;
        case 'doc': contentType = 'application/msword'; break;
        case 'xls': contentType = 'application/vnd.ms-excel'; break;
        case 'csv': contentType = 'text/csv'; break;
        case 'ppt': contentType = 'application/vnd.ms-powerpoint'; break;
        case 'rtf': contentType = 'application/rtf'; break;
        case 'zip': contentType = 'application/zip'; break;
        case 'rar': contentType = 'application/vnd.rar'; break;
        case '7z': contentType = 'application/x-7z-compressed'; break;
        default: ;
    }

    //------------
    const data = await S3.getObject({Bucket: bucketName, Key: fileName}).promise();

    return {
       headers: {
          'Content-Type': contentType,
          'Content-Disposition': 'attachment; filename=' + fileName, // Key to success
          'Content-Encoding': 'base64',
          'Access-Control-Allow-Origin': '*',
          'Access-Control-Allow-Headers': 'Content-Type,X-Amz-Date,Authorization,X-Api-Key,X-Amz-Security-Token',
          'Access-Control-Allow-Methods': 'GET,OPTIONS'
      },
      body: data.Body.toString('base64'),
      isBase64Encoded: true,
      statusCode: 200
    }
  } catch (err) {
    return {
      statusCode: err.statusCode || 400,
      body: err.message || JSON.stringify(err.message) + ' - fileName: '+ fileName + ' - bucketName: ' + bucketName
    }
  }
}
It is also possible to use Python code in the Lambda function as shown below:
Python
# The code below can be developed like the NodeJS example above

import base64
import boto3
import json
import random

s3 = boto3.client('s3')

def lambda_handler(event, context):
    try:
        fileName = event['queryStringParameters']['fn']
        bucketName = 'private-s3-for-interfacing'
        contentType = 'application/pdf'

        response = s3.get_object(
            Bucket=bucketName,
            Key=fileName,
        )

        file = response['Body'].read()

        return {
            'statusCode': 200,
            'headers': {
                         'Content-Type': contentType,
                         'Content-Disposition': 'attachment; filename='+ fileName,
                         'Content-Encoding': 'base64'
                         # CORS related codes can be added here if needed
                        },
            'body': base64.b64encode(file).decode('utf-8'),
            'isBase64Encoded': True
        }
    except:
        return {
            'headers': { 'Content-type': 'text/html' },
            'statusCode': 200,
            'body': 'Error occurred in Lambda!'
        }
Another method could be to create a presigned URL with Lambda:
JavaScript
// This method will provide a presigned url
// Callback-for-preSignedUrl.html file can be used to use the presigned URL link

var AWS = require('aws-sdk');
var S3 = new AWS.S3({
  signatureVersion: 'v4',
});

exports.handler = async (event, context) => {

  let fileName;
  let bucketName;
  let contentType;

  bucketName = 'private-s3-for-interfacing';
  fileName = event["queryStringParameters"]['fn'];
  contentType = 'application/json';

  const presignedUrl = S3.getSignedUrl('getObject', {
    Bucket: bucketName,
    Key: fileName,
    Expires: 300 // seconds
  });

  let responseBody = {'presignedUrl': presignedUrl};

  return {
       headers: {
          'Content-Type': contentType,
          'Access-Control-Allow-Origin': '*',
          'Access-Control-Allow-Headers': 'Content-Type,X-Amz-Date,Authorization,X-Api-Key,X-Amz-Security-Token',
          'Access-Control-Allow-Methods': 'GET,OPTIONS'
      },
      body: JSON.stringify(responseBody),
      statusCode: 200
    }
};
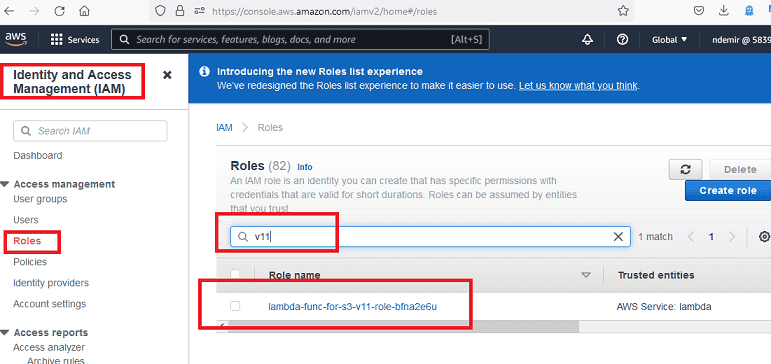
When a Lambda function is created, a role is created with it. However, this role does not have permission to access objects in your private S3 bucket. Now, we need to attach the "Customer Managed" policy we created in the previous steps to this role created with the Lambda function.
After creating the Lambda function, we can find the automatically created role as shown below:
Attach the custom policy you created in the previous step to this role; thus, the Lambda function will have restricted
GetObject access rights on your S3 bucket.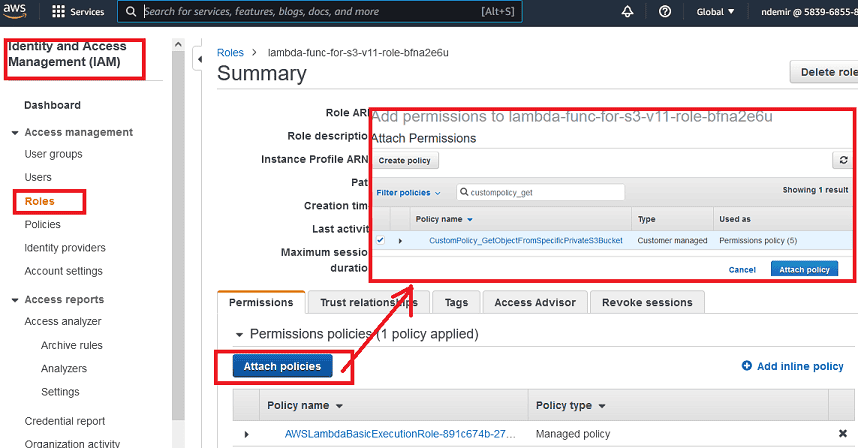
That's all that needs to be done for Lambda to access your S3 bucket. Now, it's time to create an AWS Gateway method to use our Lambda function.
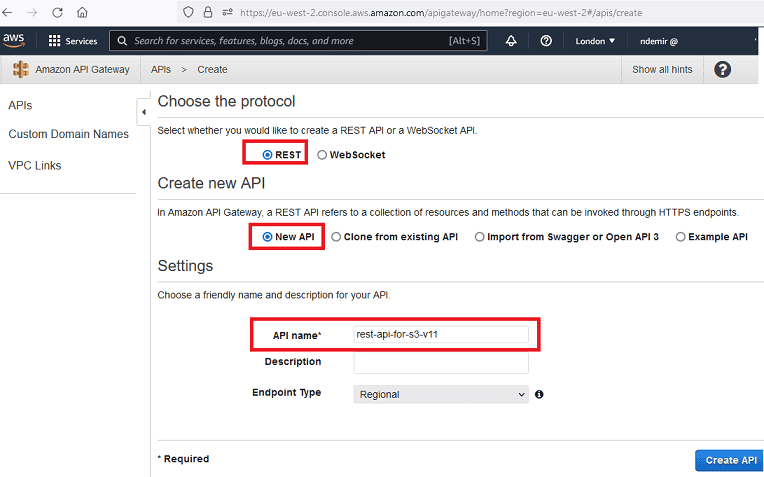
4. Creating a Gateway API to Use the Lambda Function
Create an AWS Gateway REST API as shown below. It can be seen that there are many options, but we are creating a "REST" API as a "New API". Give your API Gateway a name.
There are some steps to create and run an AWS GW API:
- Create API
- Create Resource
- Create Method
- Deploy API
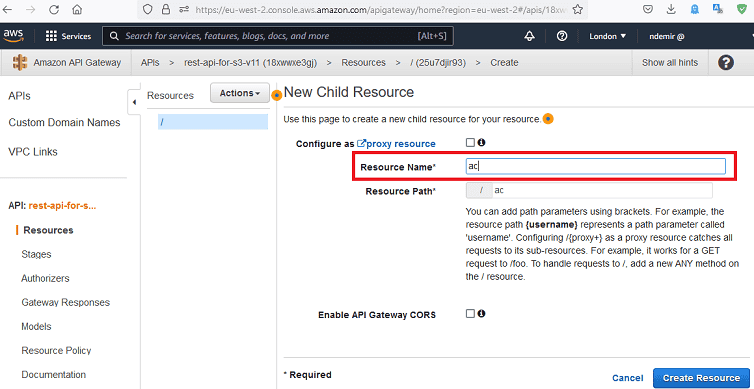
Create a
Resource for your REST API as shown below: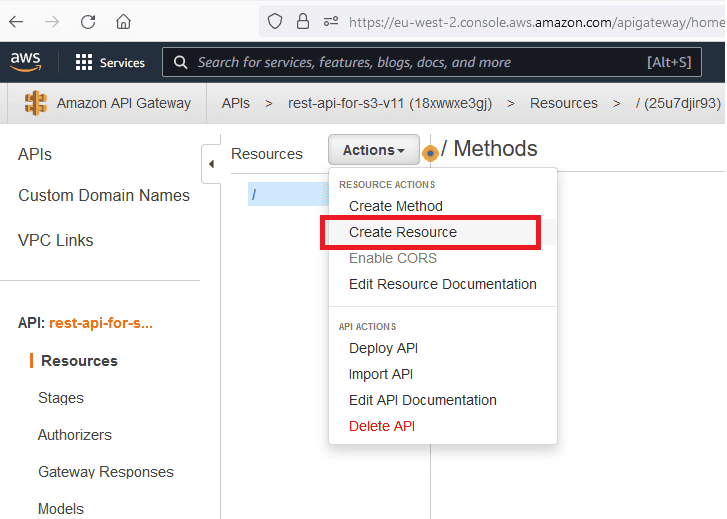
The resource created here will be used in the API's URL later.
Create a
GET method for the resource you created: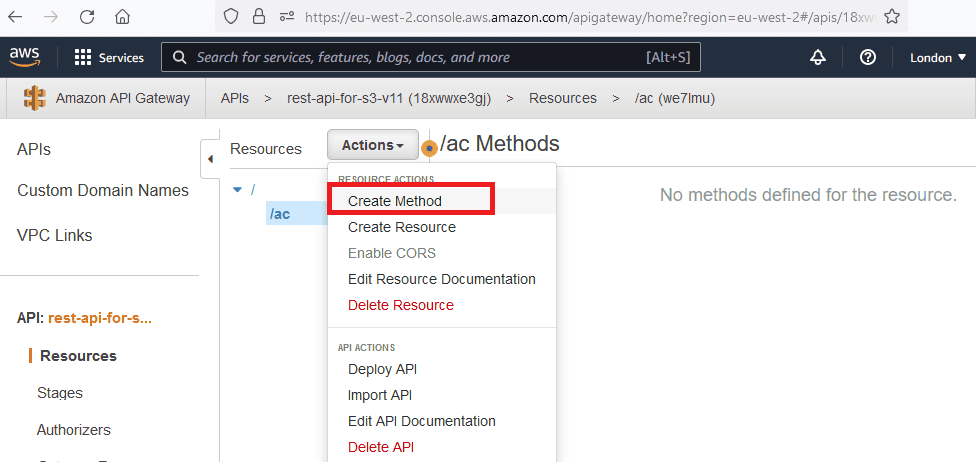
Here, any HTTP method such as
GET, POST, PUT, DELETE, etc. can be created. For our needs, we are only creating GET. Don't forget to connect the Lambda function we created in the previous steps with this method.Lambda Proxy Integration is checked here. This approach allows us to handle all response-related content in the Lambda Function.
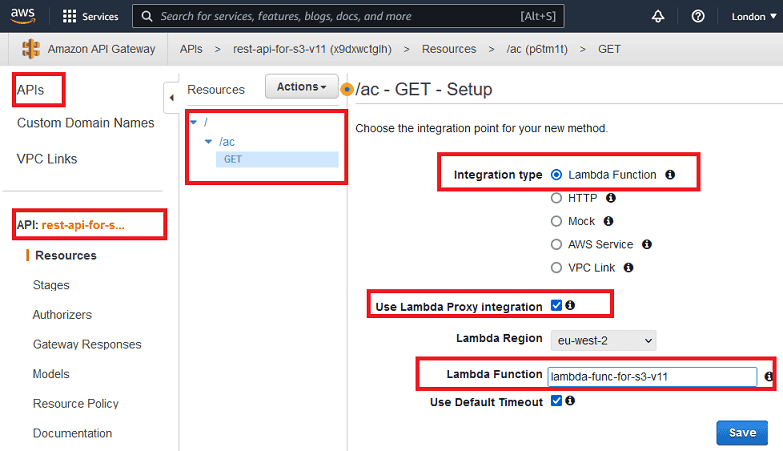
After the
GET method is created, the flow between the API Gateway Method and Lambda function will look like the following: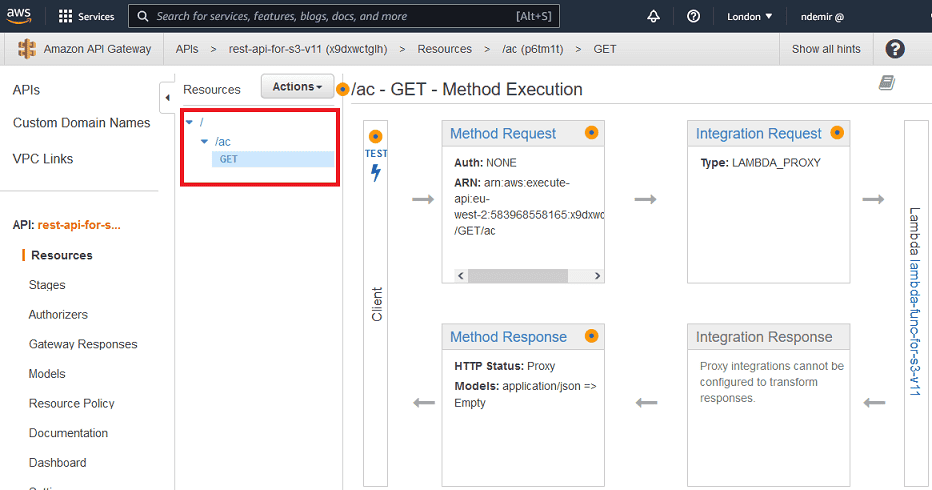
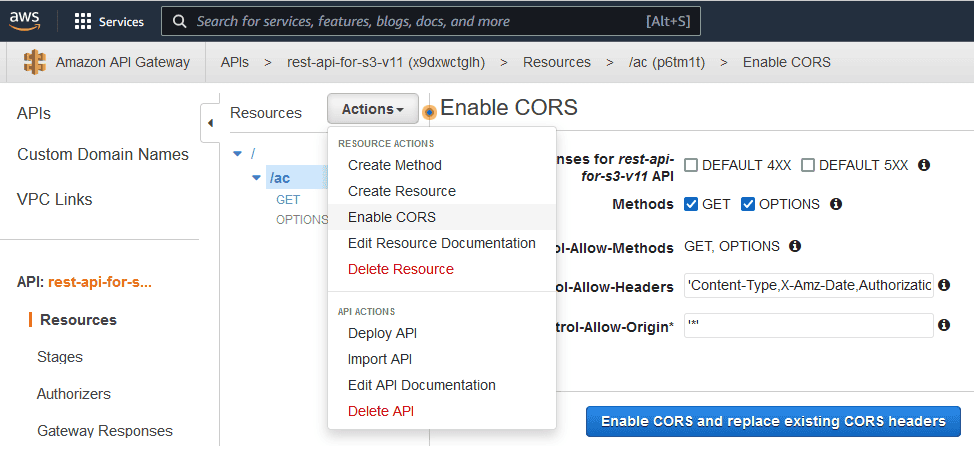
Enable CORS for the Gateway API as shown below. The Default 4xx and Default 5xx options can be checked; so even errors can be returned smoothly.
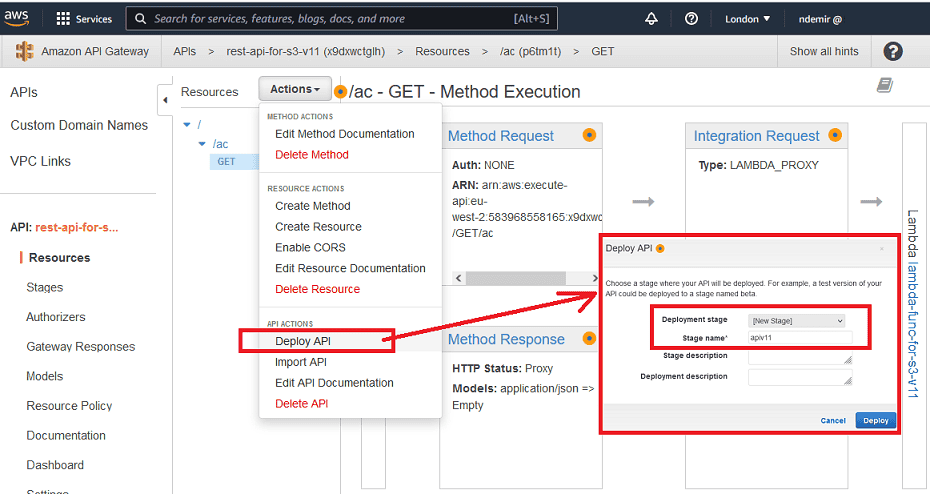
After creating and configuring everything related to the AWS Gateway method, it's now time to deploy the API. The API is deployed to a stage as shown. Also, this stage name will be used in the general API URL.
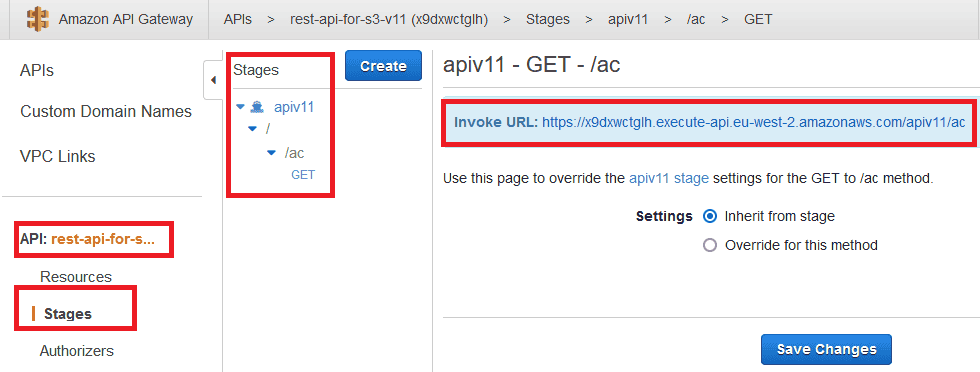
After deployment, the URL will look like the following. Now it is possible to use this link from any application.
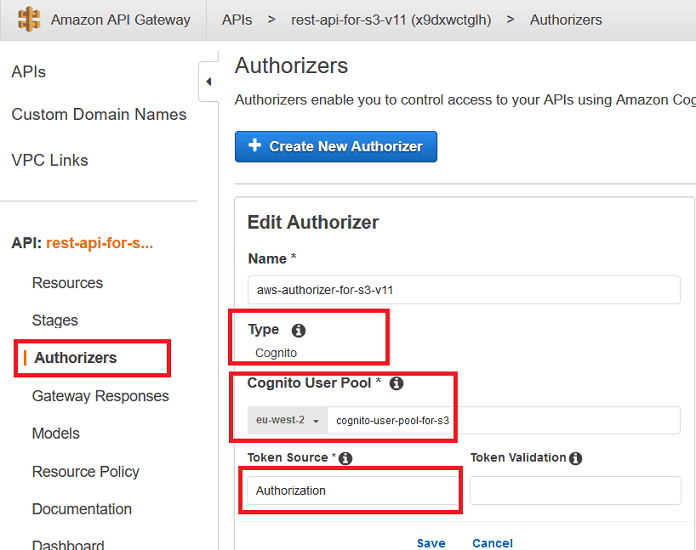
To restrict access to the API gateway, we must define an Authorizer. We can define a Cognito Authorizer as shown below.
As seen in the visual below, Authorization is the JWT token that needs to be added to the header part of the request to use the authorized API method.
When Cognito Hosted UI is sent with a Cognito user/password, Cognito will redirect the user to the callback URL by passing the
id_token and additional state data.See that the token we need to add to the header is named "Authorization" under Token Source.
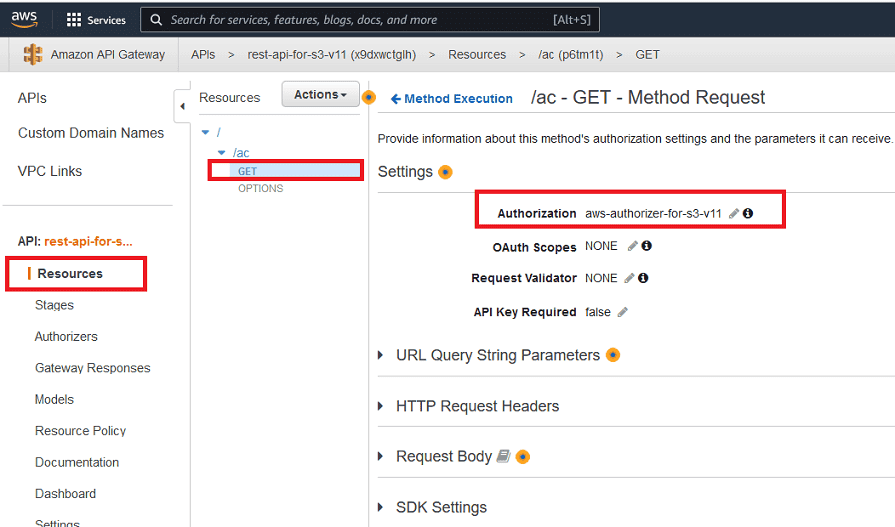
After the Cognito-based Authorizer is defined, it can be used as follows:
On the other hand, if you don't want to define an Authorizer for the API Gateway, you can restrict access to the API URL with "Resource Policy" as shown below.
If the Resource Policy is changed/added, the API must be deployed again. The IP shown as
xxx.xxx.xxx.xxx can be the server's IP. When someone tries to access the URL from a different IP, the following message will be shown:{"Message":"User: anonymous is not authorized to perform: execute-api:Invoke on resource: arn:aws:execute-api:eu-west-2:********8165:... with an explicit deny"}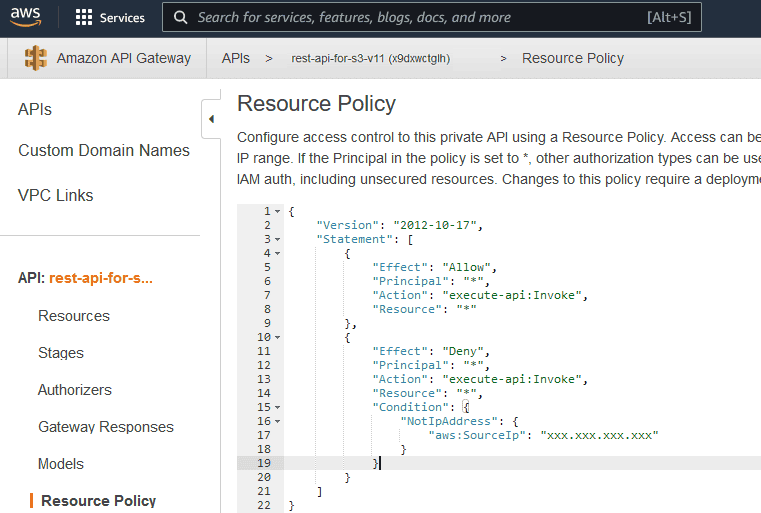
The Resource Policy JSON code will be as follows:
JSON
{
    "Version": "2012-10-17",
    "Statement": [
        {
            "Effect": "Allow",
            "Principal": "*",
            "Action": "execute-api:Invoke",
            "Resource": "*"
        },
        {
            "Effect": "Deny",
            "Principal": "*",
            "Action": "execute-api:Invoke",
            "Resource": "*",
            "Condition": {
                "NotIpAddress": {
                    "aws:SourceIp": "xxx.xxx.xxx.xxx"
                }
            }
        }
    ]
}
5. Public S3 Bucket to Be Used as a Web Folder
We need two S3 buckets for the solution. The first one was created in the previous sections. The second one is being created now and will be used as a web folder. The first one was used as a private bucket to store all files.
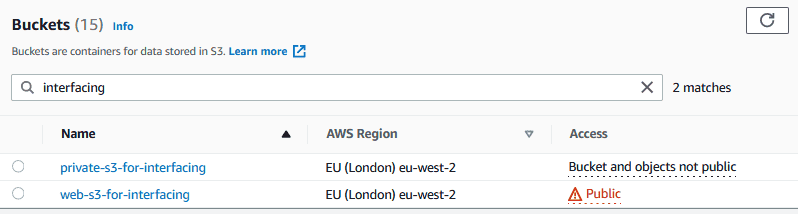
Create a public S3 bucket as a web folder. This bucket contains a
callback.html file so that it can be used as the Cognito callback address.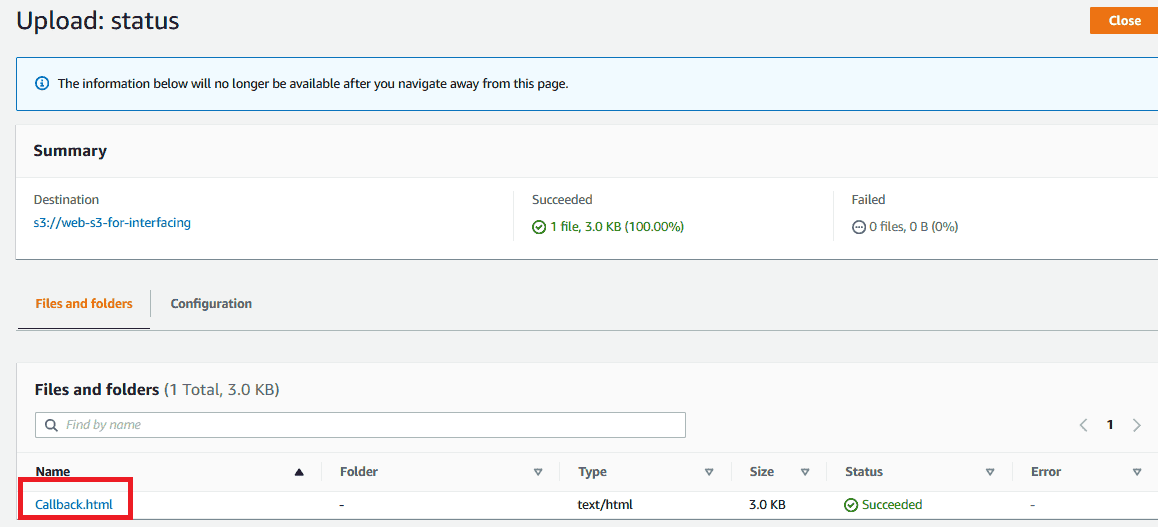
The S3 bucket for web should be public. Therefore, the following policy can be applied:
JSON
// The policy JSON will look like this

{
    "Version": "2012-10-17",
    "Statement": [
        {
            "Sid": "PublicReadGetObject",
            "Effect": "Allow",
            "Principal": "*",
            "Action": "s3:GetObject",
            "Resource": "arn:aws:s3:::web-s3-for-interfacing/*"
        }
    ]
}
Download Source Files
You can download
Callback.html and other source files from the following links:6. Creating and Configuring a Cognito User Pool
- Callback address:
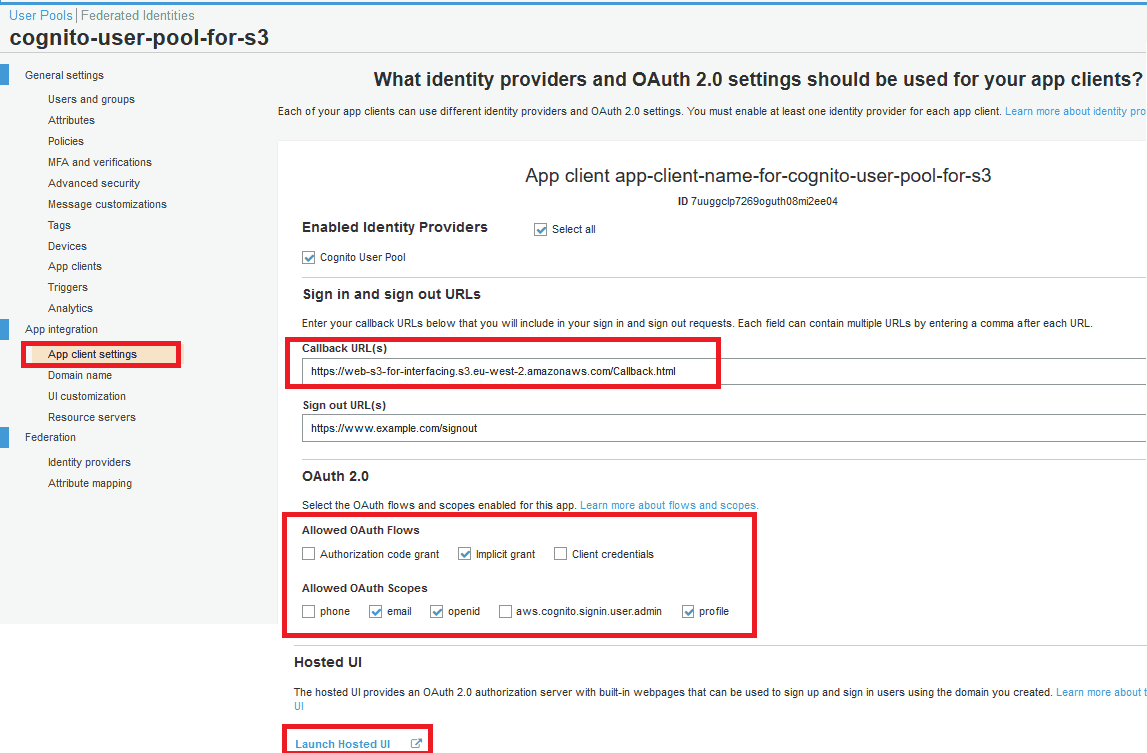
https://web-s3-for-interfacing.s3.eu-west-2.amazonaws.com/Callback.html - OAuth 2.0 Flows: Check the "implicit grant" option.
- OAuth 2.0 Scopes: email, openid, profile.
Review the hosted UI link below.
Add an additional "state" URL parameter to send parameters to the Cognito hosted login page. The "state" parameter will be passed to the
Callback.html file.The Cognito Hosted UI link contains many URL parameters as shown below:
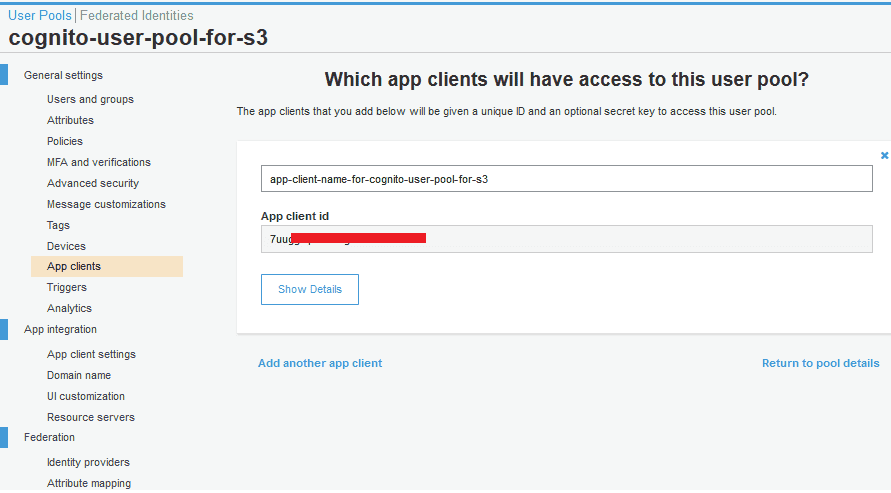
https://test-for-user-pool-for-s3.auth.eu-west-2.amazoncognito.com/login?client_id=7uuggclp7269oguth08mi2ee04&response_type=token&scope=openid+profile+email&redirect_uri=https://web-s3-for-interfacing.s3.eu-west-2.amazonaws.com/Callback.html&state=fn=testFile.pdfFields:
client_id=7uuggclp7269oguth08mi2ee04response_type=tokenscope=openid+profile+emailredirect_uri=https://web-s3-for-interfacing.s3.eu-west-2.amazonaws.com/Callback.htmlstate=fn=testFile.pdf
state is a custom URL parameter. It can be sent to the Hosted UI page and returned to the Callback.html page.A client app should be created as shown below:
App client settings can be confirmed as shown below:
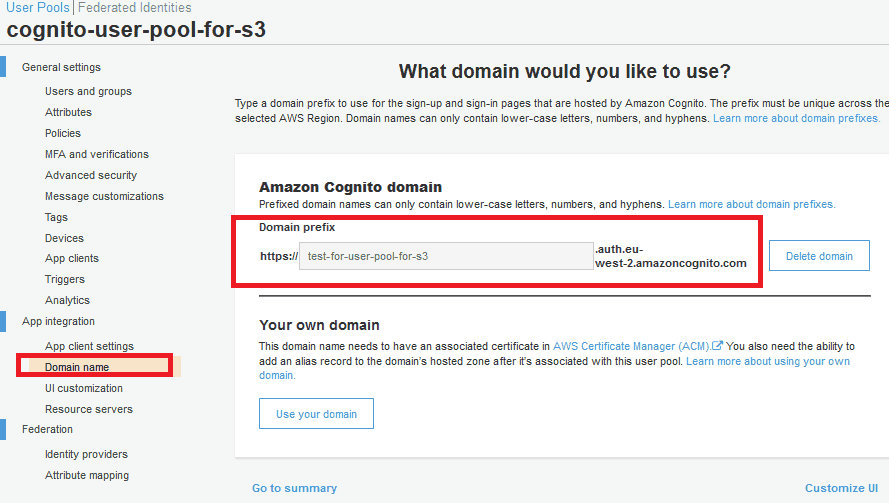
A domain name should be set so that it can be used as a URL for the Hosted UI.
7. How to Test the Scenario?
Let's see how to test the API that allows restricted access using the Cognito User Pool.
Any end user can click a link to start this process. Let's assume we have a web page hosting the following HTML content. As can be seen, the link for each file is the URL of the Cognito hosted UI.
The
LinkToS3Files.html file can be used to test the scenario.Download Test Files
Conclusion
I hope this article has been useful for those new to the AWS cloud environment.
Cloud Computing Services
We offer infrastructure design, migration, management, and optimization services on AWS, Azure, and Google Cloud platforms.
Explore Our ServiceContact Us
Get in touch with our team for detailed information about our AWS and cloud computing solutions.
Contact